Just starting out? Here are ten Days Gone tips to help you avoid the Freakers and stay alive in post-apocalyptic Oregon.
Deacon St. John, protagonist of Days Gone, is a survivor. That much is clear. Sure, he has acquaintances and even friends, but for almost all of the game, it’s you against the world. A world full of Freakers, Rippers, Raiders, and more. You need to be stocked up and ready for anything in Days Gone. Things can very-quickly turn….
To Help, Here Are Ten Days Gone Tips For New Players!
Days Gone Tips #1 – Scrap, Scrap, Scrap.
Scrap is a vital resource in Days Gone. It can be used in a number of ways, too. It can repair the damage percentage of your melee weaponry as well as the damage percentage of your motorcycle engine. Scrap also comes in handy for a number of crafting options. For example, when you find and unlock the recipe to craft a Nail Bat, you need scrap as one of the components.
With all this in mind, it’s important to stay topped up on scrap.
A lot of the Days Gone tips in this list follow on from one another, so perhaps this is the most important one.
Finding scrap isn’t always the hardest, but it’s easy to forget to pick it up. At the beginning of Days Gone, you can only carry 10 scrap. I’ve found most melee weapons, when nearing destruction, can take up to 6 scrap to repair fully. Similarly, a damaged motorbike can take up to 7 scrap to repair fully.
You don’t always have to repair your motorbike to 100% when it is damaged, though. If you don’t have the scrap, don’t worry, but it’s important to make sure it is as healthy as it can be. If a Freaker leaps onto you and knocks you off, your motorbike takes damage, too.
When you can, make sure you purchase the Carry That Weight Survival Skill. This will double your inventory space and carry capacity.
If you have trouble finding scrap, it can often be found in abandoned vehicles. A lot of them have both a boot and a bonnet for you to search. This leads me onto Tip #2…
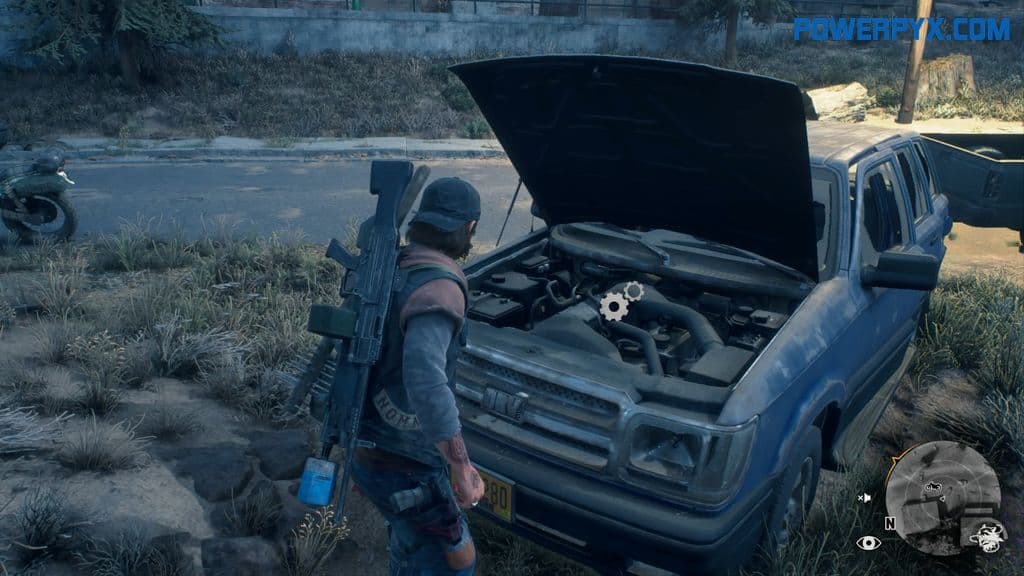
Days Gone Tips #2 – Pop The Hood First
You may have already figured this out or seen the in-game Days Gone tips… Some cars have alarms, and these alarms can go off. When they do go off, they attract Freakers. Thankfully, they’re pretty easy to turn off. You just have to open the bonnet and then interact with the alarmed engine until Deacon can fix it. He’s quite handy like that.
But they don’t just get triggered when you hit the car with something. You can also trigger the alarm yourself when you interact with either the bonnet or the boot.
So… You have to always pop the hood first.
If you open the boot and trigger the alarm, the alarm will be going off a lot longer than if you trigger it while opening the bonnet. It may only be a few seconds, but that’s all it takes.
If Freakers are nearby, any alarm could result in fatal consequences. If you have a bit of space, I’ve found that opening the bonnet first and stopping the alarm doesn’t always bring too much trouble. However, that extra time it takes to move from the back of the car to the front could be just enough time for a whole horde of Freakers to become aware of your location.
If a vehicle’s bonnet is already open slightly, that means that it can’t be opened and there is no alarm, so don’t worry too much about the boot!
Finding scrap, as Tip #1 suggests, is as important as keeping stocked up on your medicine and bandages… Even though you always have your Boot Knife, it takes a lot to kill a Freaker. Melee weapons can get you out of a jam quickly. They also can help to save you vital ammo. That leads me onto Tip #3…
Days Gone Tips #3 – Always Upgrade Your Melee Weapon (When You Can!)
Days Gone features a wide variety of melee weaponry. Some of it seems a pretty standard feature of post-apocalyptic survival games: Baseball Bats, Fire Axes, Machetes… However, some of it is a little more improvised. 2×4’s and Wooden Stool Legs can also be used to beat back the hordes. Every one of these weapons has a damage and a durability stat, too. This makes picking the right weapon vital. Do you want to go for a Fire Axe or a Machete which deals big damage, but will break easily? Or do you go for the Baseball Bat that needs you to make a lot of hits but can dish out a whole lot more of them? The choice between Damage and Durability is difficult, but it doesn’t have to be.
Just make sure you always upgrade your melee weapon (when you can!)
You can do this in the same way you craft throwables or consumables, via the survival circle that pops up when you hold L1. These upgrades drastically improve your weapon’s Damage. They may still be as durable, but they’ll kill Freakers quicker. This makes you more effective in the field and might even save your life!
Make sure that you look to unlock the Field Repairs skill as soon as you can so you can repair damaged melee weapons with scrap.
While Days Gone tips #1, #2, and #3 all highlight the importance of scrap… It isn’t the only resource out there. Molotov Cocktails are perhaps the most vital throwable in Days Gone, and you can craft them! Without them, dealing with infestations would be a nightmare. This leads me onto Tip #4…
Days Gone Tips #4 – Be Prepared To Craft On The Go
Without the Carry That Weight Survival Skill, Deacon can only carry three Molotov Cocktails at a time. This isn’t as outrageous as it sounds, if you ask me. If anything, it borders on pushing the realism Days Gone is known for. However when tackling any kind of infestation, it can prove an issue. Many Freaker hot spots have nests that Deacon needs to burn in order to clear them out. With at least three, many have four or five in a small area.
You need to make every Molotov Cocktail matter, even more so if you miss a throw in the heat of the moment. When you burn a Freaker nest, more come crawling out of it, so when you hit three in a row, you’re looking at a bit of a horde. But what if there’s another two that you need to clear out before the area is safe?
You’re left with two options. Either you run away from the chaos half-way through and come back at a later time or you scavenge what you need to craft any extra Molotov Cocktails. This is where two of my Days Gone tips clash somewhat. Hordes are bad, as you’ll see below, but infestations are worse.
Running away is a good idea, but with the craziness that is Days Gone, you might not even stop back at this infestation in a while. Scavenging would also seem like a good idea if you weren’t being chased by an angry mob of half-burnt Freakers.
This is why you need to be prepared to craft on the go.
Always make sure that you have enough materials on you to craft everything you can. This is on top of the fully stocked arsenal you should be aiming for at all times. With crafting on the go fairly easy, it effectively doubles your carrying capacity if you have the right resources.
Don’t forget: Carry That Weight will double both your inventory space and carry capacity. That’s a lot more Molotov Cocktails.
Outside of Story Missions, Infestations are one of the most important things a player has to deal with. They help to clear out Fast Travel routes and make general gameplay a lot easier. Another set of locations which deserve your attention are NERO Checkpoints. Not only do these always have medical supplies, a Gun Locker, and a bed for Deacon to rest in, but they also have Syringes which allow you to upgrade either Health, Stamina, or Focus. It’s a bit like when you level up in Skyrim.
Unlike Infestations, these NERO Checkpoints need power for you to get into them. This isn’t always hard, but this leads me onto Days Gone tips #5…
Tip #5 – Sweep For Speakers
Turning on a generator at a NERO Checkpoint has a number of advantages and disadvantages. Firstly, powering up the NERO Checkpoint opens the doors. This is handy in a number of ways. Not only does it give you all the resources and upgrades within, it also now acts as a safe point during your travels across Oregon. Need fuel? A NERO Checkpoint will always have a canister somewhere. The Gun Locker is also helpful if you need to swap out a sniper for a crossbow, or change secondary without having to go back to camp.
The generator doesn’t just power up the doors. It also turns on all the lights and activates the base’s speaker system. This is… Loud. As you can imagine, this all attracts Freakers.
Thankfully, the speakers show up on the mini-map. This means you can quickly run around and disable them. However, there is almost always more than one. Many NERO Checkpoints have four or five. Unlike a car alarm, by the time you’ve disabled ALL of the speakers… You’ve drawn the attention of a lot of Freakers.
There’s a way you can stop this, though, if you sweep for speakers.
NERO Checkpoint speakers don’t have to be going off for you to disable them. Before powering up a generator, it is vital that you do a sweep of the base and take them all out. Deacon can do this by interacting with the Square button when by a speaker. He snips the wires and it falls to the ground. Seems all well and good, right?
Wrong. Some speakers are up on towers and completely out of Deacon’s snippy reach. Thankfully, you can also shoot these speakers to disable them. A few shots of a suppressed pistol does the trick. This makes a thorough sweep all the more important. There might be more than just the speakers on the mobile unit of the NERO Checkpoint. This is probably one of the most easily overlooked issues I try to tackle in this Days Gone tips list. In the heat of the moment, it’s easy to forget about the speakers.
Some NERO Checkpoints have more than one building. Be sure to check all of them. There may only be one syringe, but there’s always speakers spread across the checkpoint.
Sound, as you probably know by now, is important in Days Gone. Making too much of it, even if you aren’t directly provoking Freakers, can result in stressful situations and tight encounters. That isn’t all bad, though; there’s one thing you can do to help you out…
Tip #6 – Always Have A Spare Attractor
Simply put, attractors are fucking great. Although what kind of Days Gone tips list would it be if I just ended it there? They’re a noise-making device that you can throw to attract Freakers. This is all well and good, but they’re not the most common item. That makes using one kind of a big deal.
That is why it’s important to always have a spare attractor.
Even with the minimap hints at Freaker locations, it is easy to get overwhelmed in Days Gone. Sometimes you’re just not equipped to fight them all off. You might be looting for scrap and accidentally set off a car alarm. The mini-map sensor lets you know the direction and proximity of a Freaker but not how many there are. With the roaming hordes in Days Gone, it’s easier than it should be to stumble across one. That’s why having an Attractor to get you out of a jam is vital.
When you clear out Ten Ambush Camps, you unlock a crafting recipe that means you can attach Attractors to Bombs. An Attractor Bomb both draws in Freakers, then blows half of them up.
Their effectiveness may also be their downfall. While rocks are good in distracting one or two Freakers, Attractors bring together a whole horde. It’s important that you only use one in desperate circumstances. You don’t want to bring yourself more trouble than you need to. Especially if your motorbike isn’t ready to go.
This could mean scrap, or fuel… Which leads me onto another vital addition to any Days Gone tips list; Tip #7…
Tip #7 – Keep ‘er Topped Up
In Days Gone, you are nothing without your motorbike. Deacon’s limited stamina, even with the upgrades, is little compared to the endless endurance of enraged Freakers. Come face-to-face with any more than two or three of them and you’re in a bit of a pickle. Deacon can only roll and run so much. Couple this with the Durability of melee weapons and the inaccuracy of firearms while moving and you’re in a bit more than a pickle. This is why it is always vital to have your motorbike ready to get you out of a tough situation. Even if you just circle back into the same area, it can afford you valuable distance from the encroaching Freakers.
This is why you should keep ‘er topped up at all times!
It is a strange reflection of the real world, but fuel is a vital resource in Days Gone. Thankfully, the fall of society has not dried up Oregon’s fuel reserves just yet, and there is plenty of it around. It’s just a case of finding it. On the map, there are several fuel pumps indicated. However, aside from the one inside Deacon’s base, they’re always in Freaker hotspots. This makes clearing out infestations all the more important. Fueling takes time. You don’t want to be caught off guard without your weapons out.
This isn’t the only place you can find fuel, though. NERO Checkpoints usually have fuel lying around. More often than not, this fuel is also needed to power up the Checkpoint’s generator. Thankfully, fuel cans don’t seem to have a capacity, so you can use them to fill up your bike, too! They also spawn throughout the world in slightly more random locations, so if you’re low… It’s worth getting off to look around.
Make sure you always check your motorbike’s well-being when you stop at a camp. The Mechanic can fully repair and fuel your bike for a price.
It is also worth noting that once you find the location of a fuel can, it should spawn in the same location every time you return back to the area, and it gets reset. If you have the time, you could make a few manual notes of where they are, or mark one with your personal waypoint. You can only have one of these on at a time, so keep that in mind.
Deacon’s motorbike is useful for more than just getting him out of a pickle, though. That leads me onto Tip #8…
Tip #8 – Quick Save All The Time
There isn’t a limit to how many times you can save in Days Gone. You just have to be near Deacon’s motorbike or a bed. However, you can’t be too close to enemies. If they’re on alert, then you have to get yourself out of it before you can save.
This is where Deacon’s motorbike once-again proves it’s worth.
Rather than going through all the effort of pausing it to save, Days Gone has an easy quicksave feature that’ll keep any progress you have made safe. All you need to do is approach Deacon’s motorbike and hold the triangle button. This takes as long as it takes for Deacon to interact with things, so it won’t hold you up. It’s a great habit to have as, if you haven’t realised by now, things can turn very quickly on Days Gone. Freakers, Rippers, Drifters, and even the wildlife are all out to get you. They don’t always make it too obvious, either, if you’re not careful.
It is worth noting that you can’t quicksave while Deacon’s motorbike is moving, so make sure you stop and quicksave before hopping off to do a mission or search the area. Holding the triangle button won’t do anything while you’re moving.
Unfortunately, as good as Deacon’s motorbike can be for you, it can also be your downfall if you’re not careful… That brings me onto Tip #9…
Tip #9 – Keep Your Eyes On The Road
By now, you’re well-aware that you need to watch out for more than just Freakers in Days Gone. Rippers are ruthlessly brutal and the wildlife is equally unpredictable. However, the one group that I find myself getting caught out by time and time again is the Drifters… And their ambush traps.
The worst part is, unless you’re really looking out for them… It’s hard to avoid. Drifters set up a wire across a major road which knocks Deacon from his bike. Then it’s a free-for-all. They attack you with both melee and ranged weapons, sometimes even a raised sniper! This, when combined with the possible threat of Freakers, makes for a truly dangerous encounter.
That is why you always have to keep your eyes on the road.
It is possible to spot these, but it’s very hard. It’s also difficult to avoid main roads, as much as I would like to. They’re by-far the most efficient way of navigating the world, and you’re less likely to get caught up with Freakers when you travel on them. In addition to this, you’ll need to make sure you’re well-equipped as your motorbike will need a full repair to get going again. This means you’ll need to be using all that scrap you’ve collected.
Clearing out Ambush Encampments around the map will make sure this happens less and less. It also helps you progress towards getting the Attractor Bomb recipe!
Thankfully, unlike an actual ambush, you can tackle the Ambush camps how you see fit. I would always recommend approaching any situation with stealth and caution in mind, but if you want to run-and-gun, there’s nothing to stop you. It might even help you clear the camp quickly and avoid being set-upon by Freakers.
That leads me to the final tip in this Days Gone tips list. Tip #10…
Tip #10 – Hordes Are Bad. Avoid Them.
Any list on Days Gone tips wouldn’t be complete without this one. This seems like an obvious point to make, but it is important to remember. Each location has a set number of hordes, as shown by the completion checklist when looking at each area on the map. However, there isn’t any indication as to where these hordes might be. This means it’s easier to stumble across one than you might think.
For example, I was recently hunting in a fairly empty area. I’d shot the stag I had been following and I began to track it’s dying movements. He’d moved down into a shallow valley with unclimbable rocks on either side. It was the perfect way for him to run, as a hunter. There was really only one way he could go. However… For a survivor, it turned out to be very bad. As I approached his carcass, there was something else out there. From the other direction, one of Days Gone’s hordes of Freakers was stumbling it’s way down the valley path.
Trust me when I say hordes are bad. Avoid them.
I managed to escape with my life, thanks to my Attractor, but I sadly couldn’t make it to the Stag before the horde. In retrospect, I am thankful, as I had forgotten to quick save for a while, but it’s still frustrating.
Utilising Deacon’s Focus and craftable explosives are vital in defeating hordes, should you attempt it. Hordes are also weaker during the daytime, so plan accordingly and try to tackle one with a planned escape route, whether that’s on foot or on his motorbike.
I commend anyone who attempts to take on a horde, early game or late. They should not be underestimated, and you should make sure you’re prepared with the right weaponry and throwables.
Days Gone is currently on sale as a part of PlayStation’s Days of Play annual event. Feel free to share any Days Gone Tips of your own in the comments!
Like what you see? Don’t forget to share our work with the buttons below! Also, be sure to follow @GamezoGG on Twitter and check out our YouTube Channel for more great content from the Gamezo Team!